

My last post asked WTF is a Service Mesh?. Now we’re familiar with the overall concept, in this article I’m going to take a dive into the most popular Mesh, Istio. This will be more practical and details-orientated than the previous blog.
For those wondering, “Istio” is Greek for “sail”, following the trend of giving kubernetes-related projects names that are nautical, Greek, or both.
History
The first public Istio release was version 0.1.0 in May 2017, and there was a presentation about it at Gluecon that spring. I remember 0.1 well, mostly because of the pain, but thankfully things have got a lot better since. There have been a few milestones since then: May 2018 brought 0.8, the first Long Term Support release, promising long-term stability of the primary config types. 1.0 came out in July 2018, marking the core code as production-ready. Istio now follows a regular three-month release cadence, and at the time of writing the latest version is 1.15.
Software, i.e. code, version numbers are only one part of the story; the CRDs which form Istio’s config surface (API) are versioned separately. Stability of the primary group of APIs, networking.istio.io, is critical for backwards compatibility. As I mentioned, Istio 0.8 was the first attempt to settle on a long-term definition of them, the v1alpha3 version, which is still supported today. The next, and currently latest, evolution, v1beta1, was introduced as part of Istio 1.5 in March 2020.
Istio was started by folks at Google, and after 0.1.0 was open-sourced, development was continued by Google, IBM, and a few others. In April 2022, Istio licensing rights were given to the CNCF (Cloud Native Computing Foundation), an independent organisation that’s part of the Linux foundation.
Execution Environment
Let’s start with the practical details: what is it, and where does it run?
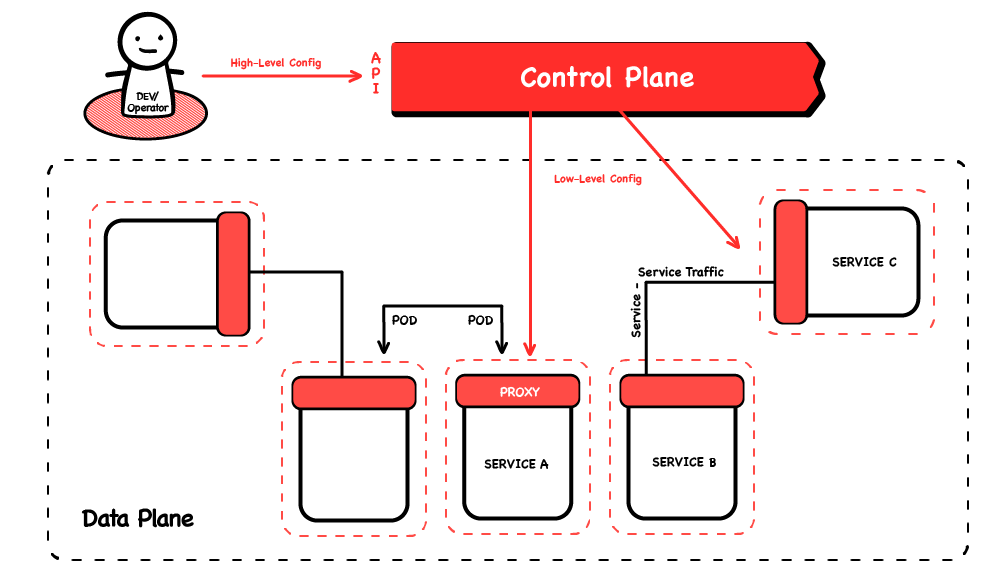
As I outlined in the previous article, a Service Mesh consists of a Control Plane, and a Data Plane. The control plane, the brains if you will, takes high-level configuration written by users and programs the data plane—the sidecar proxies that handle the actual traffic. This control plane is “Istio proper” if you like; this is the code the Istio project produces. While some service meshes (Linkerd 2 is the notable example) have written their own proxies as well, the Istio data plane is made up of multiple instances of the Envoy proxy (a separate and thriving project in its own right). Note that when people talk about “the mesh”, they normally mean the data plane.
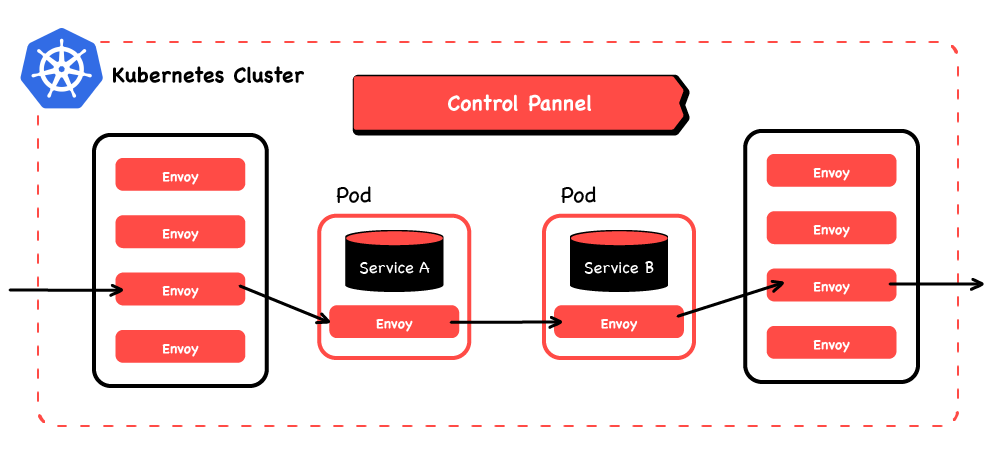
The Istio control plane is designed to run in a Kubernetes Cluster. It actually has to run in Kubernetes, as it depends on some of the support features that Kubernetes’ execution environment provides. Although it’s “special” to Istio, as far as Kubernetes is concerned the control plane is just another workload.
The data plane can run in lots of different environments, but sidecar proxies alongside workloads in k8s are the easiest and most common. If workloads are in-cluster, the k8s-based Istio control plane can use k8s’ mutating webhook admission controller feature to auto-inject the sidecars into workloads. It can also call various k8s APIs to understand where they are (worker node, zone, region), letting it automatically orchestrate locale-aware routing (e.g. prefer closest). These kinds of features add up to powerful user-experience advantages. In particular, not having to modify workload definitions (e.g. deployments) with sidecar proxy information not only keeps them shorter and neater, it also keeps application and infrastructure concerns separate, which has organisational and security advantages.
The ability to add sidecars to workloads outside of the cluster (so-called “mesh expansion”) is a powerful feature for modernising legacy workloads, though note that you have to be able to manually install the sidecar proxy on the same host and set up traffic interception. So, while such “mesh expansion” isn’t trivial, it can bring the benefits of the mesh to workloads that aren’t (yet) running in a Kubernetes cluster.
A lot of people find this a useful way to migrate workloads into Kubernetes: start by getting insights into their traffic, applying policy to it, etc. Once they’re observable and controllable entities, moving where they run becomes a lot easier.
Managed Istio
Related to the question of where Istio runs, is who runs it.
Given any Kubernetes cluster (and sufficient privileges, but I assume you’re the admin), you can install Istio yourself, which I’ll describe briefly later.
Bear in mind that’s just “day 0”—the mesh still needs upgrading and so forth—so an alternative is to use a “managed” Istio. There are a few options available (some more managed than others) including:
- Anthos, from Google, which is a suite of solutions, including a separate mesh component. It can run in clusters outside of GCP as well, but needs to call back to Google’s systems, which you might need to consider when thinking about failure-tolerance
- RedHat’s OpenShift has a mesh option, where a Kubernetes Operator installs and upgrades the mesh
- Amazon’s EKS doesn’t have an Istio option, but Tetrate’s FIPS-certified Istio Distribution is in the add-on marketplace
Going even further, management planes like Tetrate’s Service Bridge (TSB) provide full management of multiple Istio meshes; installing them, upgrading them, and configuring them based on a higher-level model.
Installation
If you decide to run your own Istio, getting Istio deployed correctly isn’t necessarily a trivial task, and there are a few different ways to achieve it. I won’t detail the actual install process in this article, but I’ll go over the various options as they illuminate various interesting facts about Istio. If you want to try Istio out at home, the official docs are pretty comprehensive.
Istio’s installation used to be via (really big) helm charts, but mercifully modern Istio versions are installed by a piece of code. This code’s main job is to generate the Kubernetes manifests that run Istio (deployments and the like) and apply them to a Kubernetes cluster.
This code can run in a couple of different ways:
- It’s built into the
istioctlCLI binary (Istio’s equivalent of kubectl), run by using the verbistioctl install. - The code is also packaged as an operator; a piece of code that can be run in a Kubernetes cluster. This runs the install code over and over, reconciling any differences between what the Istio deployment should be like, and what it is like. This is like running the installer over and over, and can revert issues caused by people making ad-hoc changes to the deployed system.
Both take the same configuration, which is a Kubernetes-style resource called IstioOperator, supplied as a YAML file.
The istioctl install command takes it as a command-line argument pointing to a local file, whereas for the operator it’s deployed into the cluster as a CR.
As for getting a copy of “Istio” itself, remember that it runs as k8s workloads, the container images for which will be fetched by the cluster.
All the mesh administrators and users need is a copy of the istioctl client CLI. This can install Istio (as it contains the k8s manifests to do this) and is then the client for interacting with the installed mesh.
It’s in a few package managers, making it easy for users to get started (e.g. Homebrew has it, but as of this writing Ubuntu’s apt repositories don’t). If it’s not packaged by your system, you can download it directly from upstream (being a Go programme, it’s statically linked with no external dependencies, so is easy to run anywhere). Note that that gets you a bundle of stuff, including lots of sample config YAML, but bin/istioctl is in there too.
Downloading from upstream guarantees us the latest version of istioctl, which means we’ll install the latest version of Istio into our cluster—since the installation manifests are contained in istioctl, those two versions are coupled.
While istioctl install will get you started, there are other ways to perform the installation. e.g. for a production environment you might want to have istioctl dump out the manifests it contains, and check them into a git repo so that a GitOps agent like Flux or ArgoCD manages Istio.
Architecture
So, what gets installed? What’s the architecture of Istio? I did several presentations about Istio’s initial architecture and workings, which you might want to check out, as that initial design is still interesting and relevant to study today. Things have changed a bit since then, and I’ll briefly go over the internal workings now.
Data plane
As I’ve mentioned a few times, there is a layer 7 (eg HTTP) proxy alongside each workload, which enhances its networking features—the headline examples of advanced traffic routing, resilience features, security policies, strong workload-to-workload encryption, and deep observability. Soon there will actually be an option to reduce this to one proxy per Kubernetes node, serving all the pods. The idea behind this is to save on resources, but it’s disputed whether it’s a good idea.
Additionally there is usually an ingress gateway, another set of proxies doing external-facing actions like terminating TLS and checking client credentials (eg JTWs). These proxies stand alone; they’re not sidecars to anything, they just handle ingress.
Strictly speaking, this component is redundant. The stand-alone proxies running here are the same as the ones running as sidecars, so why can’t the sidecars do everything, including interacting directly with clients out on the internet? The answer is that they can, but that would need each service pod to be directly accessible to the whole world via a public IP. Many organisations are uncomfortable with that, and chose to give a public IP only to a dedicated set of proxies (the ingress gateway), which they often run on dedicated servers.
Although not part of the installation profile default (but part of demo), Istio can also feature an egress gateway. This adds an extra hop for requests on the way out, which, similar to ingress, can enforce access controls, establish TLS connections with external hosts, etc.
Like the ingress gateway, this is also technically redundant. In fact fewer people deploy it, because often all pods in the Kubernetes cluster will be able to make outbound calls (now via their sidecars). But again with security in mind, it may be desirable to force all outbound traffic through specific proxies on dedicated nodes, using the firewall to prevent egress from anywhere else.
All these components can be chosen “à la carte”: running as many or as few of them as you like. Some people just deploy the “mesh” of sidecar proxies, providing their own gateways or going without. It’s also possible to just deploy the ingress gateway, which is similar to any other Kubernetes ingress controller, but configured by Istio’s expressive CRDs. However most people deploy all the components, which of course work well together.
Control plane
The sidecars and gateway(s) are configured and co-ordinated by the control plane. The control plane used to be a set of microservices (as is the fashion), but Istio underwent a major architectural change a couple of years back, which is discussed in an Istio blog post and which I will be talking about in November.
Since this redesign, the control plane is one single pod, istiod, running in the istio-system namespace.
Extensibility
Of note is that some of the data plane behaviour isn’t provided to the proxies as configuration, but rather as dynamically-injected code, using Envoy’s WASM support. This is part of the architectural changes that occurred: sophisticated decisions about e.g. access control policy used to be made in a control-plane component called Mixer. This behaviour was moved out into the sidecars by injecting WASM into them.
Envoy’s support for being extended through WASM plugins is a very powerful feature: it’s not just Istio itself that can make use of this feature; users can also inject arbitrary code. Istio makes it easy to inject WASM modules into sidecars through a dedicated custom resource type. You can write arbitrarily powerful code to validate, manipulate, and report request headers and bodies.
Default features
Now we know how Istio works, with its control plane, sidecars, ingress and potentially egress gateways, what does it give us out of the box?
Even without configuring the mesh at all, we get a number of benefits “for free”.
Because the sidecars are intercepting and handling all traffic in and out of the workload, they can produce logs about each request and response, which can be sent to a logging server. They can also produce traffic flow statistics, which they can send to a metrics server, and trace spans, which they can send to a tracing server.
Istio’s installer can even deploy a demo instance of each of these observability servers for you, letting you get the benefit of the service mesh really quickly (specifically: ElasticSearch, Prometheus, and Zipkin). In this world of microservices, this observability can prove invaluable in understanding and debugging complex distributed systems.
Another “free” feature is automatic and transparent encryption of all traffic between sidecars. This is another great piece of developer experience since app devs can just offer plaintext HTTP (not HTTPS) servers, and make plain HTTP calls, but get strong encryption of those requests.
Config
What if we want behaviour beyond the free stuff? I’ve covered the features a few times so I won’t repeat them, but it’s worth noting that a lot of them aren’t, and cannot, be on by default: The mesh can’t automatically enforce request deadlines, as it doesn’t know how long the app is expected to take. Likewise, it can’t retry requests, since it can’t know which ones are safe to retry and which aren’t. All of these features need configuring, which is done via the Istio API.
Istio exposes its API not as, for example, a gRPC endpoint, but by installing CRDs into its host Kubernetes cluster. To configure Istio you deploy instances of Istio’s resource types into the cluster too.
The practical upshot of this is that administrators and users configure Istio by writing YAML files.
These “YAMLs” follow the Kubernetes style—Group, Kind, Metadata, Spec, sometimes Status. Like any other resource, they can be deployed with kubectl apply, or any of the myriad more complicated options—templated by Helm charts, deployed by a CD pipeline, synced with GitOps.
In the current 1.15 version of Istio there are 15 Istio resource types—think of these as different endpoints on the config API, or different config file types. I won’t go over all the custom resource definitions in this article, and besides the upstream docs are comprehensive.
The resources are split into various groups, with the following being all the groups and the main config types you’ll use
- Install.istio.io
- IstioOperator - install-time config for Istio, e.g. which gateways to deploy
- Networking.istio.io
- Gateway - tells Istio to open an ingress gateway port to the outside world
- VirtualService - routing and manipulation instructions for traffic matching specific hosts, paths, headers, etc
- DestinationRule - tells Istio how to send traffic to a particular app, e.g. timeouts and retries
- Security.istio.io - policy for authenticating and authorising requests
- Extensions.istio.io
- WasmPlugins - custom code to inject into the sidecars
- Telemetry.istio.io - config for observability data collection and forwarding
Egress Stance
There’s another resource you’ll occasionally have to use from the networking group: ServiceEntry.
When VirtualServices and DestinationRules state the hostnames of their destination, those names are first checked in Istio’s service registry*. If they’re not in there, they are then looked up in DNS.
Due to k8s’ in-cluster DNS server, hostnames of both in-cluster services and external internet domains will be found, so DNS alone is sufficient for service discovery of any potential destination. However, ServiceEntries allow you to override the DNS lookups and provide extra metadata for the hostname. The usual use for this is to say that the service in question has an Istio sidecar (even if it’s not a k8s workload)—informing Istio that you extended the mesh to that traditional workload.
Sadly there’s no easy way to view this registry, you just have to infer it from the service discovery systems it’s plugged into (eg for k8s, the Service resources in that cluster), plus the set of ServiceEntries you defined manually.
There’s also a global egress setting, which when set means a hostname can only be used if it’s in the service registry—sending requests anywhere else is denied.
Istio automatically populates its service registry from the list of Service resources in k8s, so in-cluster communication will work automatically. However every non-k8s workload, and every internet endpoint you want to talk to, must now be in the registry too. ServiceEntry lets you manually add them, effectively allow-listing egress destinations. This can be a good security stance and a good experience for the mesh operator, as this allow-list can easily be eyeballed.
User Experience
With the config being provided in files, and multiple separate ones at that, you can build several different developer experiences: keep an app’s Istio config in a separate repo; with that app’s (Kubernetes) deployment config; or, alongside its code.
As a developer I like keeping it all together: everything that describes my app, from the programme that encodes its behaviour to the YAML definitions of its run-time compute and networking environments, are in one place that I can cast my eyes over. I like to think of the mesh as part of my app—I defer functions to it (say, JWT validation)—so that I don’t have to write them myself, over and over. I think of writing k8s YAMLs as telling k8s how the app works—how does it scale? What do alive and dead states look like?
Likewise I tell Istio how the app works—which protocols are expected on which ports? Which endpoints are idempotent and thus retryable? Which paths are accessible to whom? How long is a particular API expected to take (described by using double that time as a timeout).
Other Notable Features
Although I’m not going to cover all of Istio’s features, I’d like to point out a couple of the more exciting ones:
- Locale-aware routing—Istio can talk to Kubernetes to know “where” each workload-sidecar pair is: which cloud region, zone, and host they ended up on. Using those data it can route requests to the closest instance of a service, keeping latency low, and avoiding cloud ingress/egress fees between zones. (You can use the Tetrate Cost Analyzer to understand your current costs.)
- Multi-cluster—Istio data planes in multiple clusters can be combined so that all the services in each cluster can reach all the others. There are a few ways to design this, but in my opinion the best practice is having one Istio control plane per cluster. You can still think of this as one mesh, but with better failure and performance characteristics. Configuring each of the Istio instances so that all services can talk to all others requires a lot of work. While this is possible manually, a central management plane like Tetrate Service Bridge that auto-generates them will really help.
Further Reading
This article has covered Istio in some detail: specific, practical details about how it’s built and what it can do. Some of this it has in common with other service meshes, some differentiate it.
If you’d like to learn more about Istio in particular, or, since it’s the most common mesh, use Istio as the way to learn about service meshes in general, you have a few routes.
There’s a load of material out there of course, but I’d point you in particular at the official documentation, specifically the tasks section.
I’d also recommend my company Tetrate’s free on-line Istio training.
Finally, I’d be remiss if I didn’t mention my own website, where I link to all my talks and blogs, a lot of which are about Istio.