
Have you ever felt pain in your hand or arm at the end of a regular day’s work?
Or have you ever felt like it was impossible to stay focused for more than a few hours?
What if I told you that, by the end of this article, you might have a way to get rid of it all?
Whilst a big part of our jobs in Cloud Native aims to remove friction when building and deploying software, we often overlook the first step of getting our thoughts on (digital) paper. Indeed, it can greatly improve our well-being by reducing pain and fatigue related to computer work. The goal here is not to type faster, but rather to maximise the energy that will go into an actual task instead of being lost on the means to achieve it. It can also significantly help you increase your productivity by achieving a state of flow more quickly and consistently, with all the advantages that this entails.
This article will explore the different steps you can take to make your personal Developer Experience (DevEx) smoother, on the road to frictionless.
Ergonomics
Whilst manufacturers love to employ the word ergonomics to justify exorbitant pricing for their products, this shouldn’t blind us to the fact that ergonomics are crucial in looking after the long-term health of those who spend their days engaged in computer-related tasks.
In the short term, ergonomics can offer immediate relief from common causes of pain. Adjusting things such as chair height, desk setup, and monitor position can alleviate discomfort in the neck, shoulders, and wrists, leading to less fatigue and increased productivity throughout the workday. Longer term, good ergonomics significantly reduces the risk of developing musculoskeletal disorders which are common afflictions of software engineers, including carpal tunnel syndrome, tendonitis, and chronic back pain. The consistent application of ergonomic principles can greatly reduce the risk of injury, improve overall work efficiency, and contribute to a better quality of life.
Although certain pain points may be simpler to address, others could be more obscure. If you experience back pain, assessing your posture, or taking a brief walk can work wonders. Likewise, if your eyes are strained, adjusting the room's lighting and experimenting with options such as dark mode might help alleviate discomfort. But what about pain in your arms or hands? Yeah, sure, you could try copying and pasting less to avoid extending your pinky to the CTRL key, but will it really help? And let's not talk about the slight effect it could have on your productivity…
Productivity
Whilst you should absolutely seek medical advice if these kinds of problems persist, it is also a good idea to be aware of the different possibilities around ergonomic mechanical keyboards, like moving modifiers to be used with thumbs instead of pinkies, which can be greatly beneficial.
In the same way we remove friction in the development lifecycle thanks to DevOps concepts and other DevEx considerations, we can also remove friction in our personal DevEx in order to improve our productivity. Not only will we be able to be more efficient, but we will also be able to stay focused for longer, and be less tired at the end of the day. Indeed, thinking about ergonomics can pay dividends even if you are fortunate enough to feel constant bliss while working, without any physical pain at all. To understand why, we need to take a detour to look at flow theory. Developed by psychologist Mihaly Csikszentmihalyi in the 1970s, it describes a mental state in which individuals become fully immersed and engaged in an activity, resulting in a heightened sense of focus, enjoyment, and fulfilment. Flow is often referred to as being "in the zone"; that glorious feeling where you lose track of time and are completely absorbed in the task at hand.
This state has been linked to increased creativity, productivity, and overall well-being, thus the faster you can get into a state of flow, and the longer you can stay there, the better.
To attain it, one of the things you need to have is a set of well-defined goals and objectives, providing a sense of purpose and direction, as well as a balance between challenge and skill, so that the task at hand is neither too easy nor too difficult. Other conditions that are more interesting for us here are the ability to fully concentrate on the task at hand, free from distractions or interruptions, and a sense of control over one's actions and environment, contributing to a sense of autonomy and mastery. In a state of flow, the individual becomes less self-conscious and more focused on the task, leading to a heightened sense of enjoyment and intrinsic motivation.
To help you getting there, I need to introduce you to ergonomic mechanical keyboards.
ErgoMechKeyboards
Ergonomic mechanical keyboards inspire such passion that there is an entire ErgoMechKeyboards subreddit where, and I quote, most people [...] are deeply kinky deviants doing unspeakable things with QMK.
Whilst this might sound rather peculiar, it is not so far from the truth. But I promise it is Safe For Work and you can keep on reading.
Let's first define a few things:
- Mechanical: "classic" keyboards are membrane keyboards. They have a flat, flexible layer (or layers) made of plastic or rubber that covers the entire key matrix. When a key is pressed, it pushes down on the membrane, creating a circuit and registering the keystroke. "Mechanical" keyboards are a type of keyboard that uses individual mechanical switches for each key. These switches consist of a stem, spring, and keycap, and they provide (more or less) tactile and (more or less) audible feedback when pressed.
- Ergonomic: Ergonomic keyboards often feature design elements that promote a more natural hand and wrist position while typing. Some key features of ergonomic keyboards may include:
- Split design
- Ortholinear layout
- Curved or tented layout
- QMK and ZMK: Quantum Mechanical Keyboard (QMK) and Zephyr Mechanical Keyboard (ZMK) are open-source firmwares designed for custom mechanical keyboards. They allow users to fully customise their keyboard's functionality, from key layouts and macros to backlighting and advanced features.
So what is so interesting about ErgoMechKeyboards?
First, they have the same benefits as regular mechanical keyboards, which are the use of switches, keycaps and often the possibility of using custom firmware like QMK.
You can find people talking a lot about switches on the internet, debating with passion whether linear, tactile or clicky switches are the best and expressing profound disdain for anyone using MX brown. This is without talking about the plethora of tutorials on how you can lube (yes, lubricate) your switches and stabilisers to remove any unwanted friction during keypresses. Whilst all of this might have some merit, if you are new to ergonomic keyboards I recommend focussing first on keycaps.
There are many keycap profiles and this is what will impact you the most with the key layouts as this is what your fingers will constantly touch, even when simply resting your hands on the home row of your keyboard. Rather than diving into all the details here, I’ll instead point you to keycaps.info where you can see all common profiles and compare them. Excellent though it is, something you can't see on the website is the top profile of each key, which can differ greatly, from being almost flat, to scooped on one axe, to fully scooped. To make matters worse, the feeling you have when using a certain keycap profile will greatly change depending on the shape of your keyboard! Available profiles are also very different depending on whether you choose normal size keys and switches or low-profile ones that are especially practical for transportation.
This is already quite a lot of possible customisation, what can ErgoMechKeyboards have more than this?
The first thing that you will notice in most cases is the absence of horizontal staggering, which means that columns, like edc on a QWERTY keyboard, will be on top of each other and not slightly off on one side. This staggering has its roots in the design of early typewriters. Their mechanical linkages connecting the keys to the typebars (the bars that struck the paper to create an impression of a letter) needed to be arranged in a certain way to fit the available space and avoid jamming. If you've ever heard the story of the QWERTY layout, you might find similarities here. And, in both cases, the only reason we haven't changed is that change is hard.
Partly this comes down to fear. It isn’t unreasonable to imagine that switching to a more ergonomic keyboard layout would take a great toll on your productivity for weeks or even months until you get used to an ergonomic keyboard. Whilst this would be true when switching layout from, say, QWERTY to Dvorak, switching from a standard keyboard to an ErgoMechKeyboard usually only takes a few days to get used to, up to around two weeks when switching to a more 3d-shaped keyboard like a Dactyl-Manuform or Skeletyl. Why? Because the changes you need to get used to make sense:
- In terms of columns, in example, the E key is on top of the D key, which is on top of the C key. This is easy to remember and follows the travel path of your finger, there is no weird and inconsistent lateral movement here.
- In terms of software, it is possible to map keys in a way that makes sense for you. For example, if you always forget where a specific symbol is, simply map it to the first place that comes to mind when thinking about it.
In this context it is worth noting that horizontal staggering is ergonomically bad and makes it harder to touch type. ErgoMechKeyboards use, in most cases, ortholinear or vertical/columnar staggered layouts:
.png?width=770&height=314&name=normal%20stagger%20(1).png)
.png?width=1001&height=396&name=matrix%20stagger%20(1).png)
.png?width=1001&height=403&name=coloumn%20stagger%20(1).png)
In the first case, keys are arranged in a grid format where the keys are aligned both horizontally and vertically, forming straight columns and rows. Vertical staggered layouts aim to better accommodate the different lengths and natural positioning of a person's fingers. In this layout, the keys are arranged in columns that are offset relative to one another, which closely follows the natural curve of the fingers when they rest on the keyboard. This is intended to reduce finger strain and movement, potentially increasing comfort and typing efficiency. By aligning keys in columns, the vertical staggered layout can help to minimise lateral finger movements and allow for more comfortable, straight up-and-down motions. This can be especially beneficial for users who experience discomfort or pain from repetitive strain injuries (RSIs), such as carpal tunnel syndrome or tendonitis, when using traditional horizontally staggered keyboards.
Complementary to this, split layouts take the ergonomic concept of vertical/columnar staggered layouts one step further by dividing the keyboard into two separate halves or parts, like this:
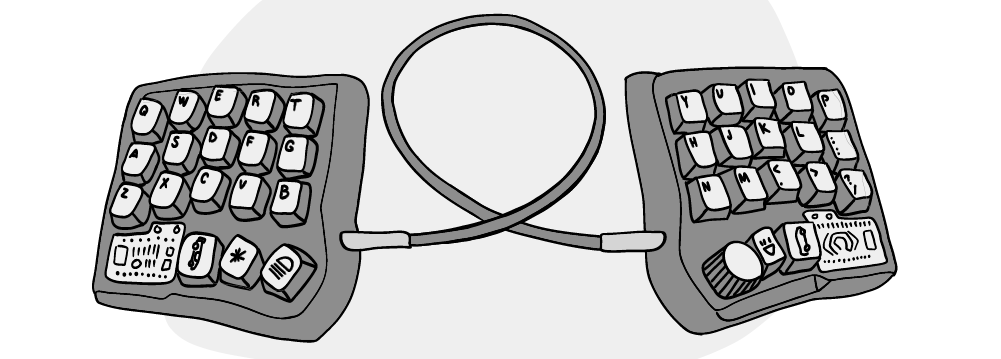
These halves can either be joined together on a single board or be completely separate pieces, allowing users to position each half independently for optimal comfort and ergonomics. They aim to address some shortcomings of traditional keyboards by offering additional ergonomic benefits:
- Neutral wrist position: by separating the keyboard into two halves, users can position each half at a comfortable angle that allows for a more neutral wrist position.
- Shoulder and elbow comfort: split keyboards enable users to place each half at a distance that suits their shoulder width, allowing for a more natural and relaxed position of the shoulders and elbows. This can help alleviate tension and strain in the upper body.
- Tenting: many split keyboards offer adjustable "tenting," which means raising the inner edges of each half so that the keyboard slopes downward from the centre. This creates a more natural hand position, reducing pronation (inward rotation of the forearms) and associated strain on the wrists and forearms.
- Thumb keys: some split keyboards feature extra keys positioned near the thumbs, which are typically underutilised on standard keyboards. By assigning frequently used keys or modifiers to the thumb keys, users can improve typing efficiency and reduce finger travel distance.
-1.png?width=297&height=253&name=single%20keyboard%20with%20hand%20(1)-1.png)
This last point was a life changer for me as it allowed me to have much more natural movement for shortcuts involving CTRL or any other modifier. When using a "regular" keyboard, I would start having strong pain before midday, every day. After starting to use an ErgoMechKeyboard, I've never once had pain again. I am not saying here that everyone will have the same experience, as you can find many people struggling to find the right keyboard that will allow them to be pain free, but I do think that it's important to know the different possibilities currently available.
Writing custom keyboard firmware
While there is quite a lot of customisation to do at the hardware level, we haven't even talked about software! Indeed, as mentioned earlier, most ErgoMechKeyboards support writing your own firmware either with QMK, which is most commonly used for wired keyboards, or ZMK, which is the default for wireless keyboards. Entire articles have been written on it, including the absolutely amazing A guide to home row mods by precondition, as well as a Tour of a split ergo keyboard and a slew of other great articles from Pascal Getreuer; it opens a world of endless possibilities.
For the sake of the article, let's try to summarise the main ideas. Writing custom firmware allows people to customise all key mappings on different logical layers. This means that there is no need to have a lot of physical keys anymore, as all keys can be reorganised to avoid unnecessary movement, and also to make sense personally. I already talked about modifiers on thumb keys earlier, but it's even possible to go further and use what's called home row mods. Your home row, asdfghkl; on QWERTY, becomes modifiers when keys are held instead of just pressed! It is not for everyone as it can also be quite tricky to set this up properly to avoid wrong key presses, but it is an interesting possibility.
The flexibility offered by custom firmware empowers users to tailor their keyboard layout and functionality to their unique preferences, ultimately creating a more enjoyable and efficient typing experience.
But what about mice?
Unfortunately, using a regular mouse can also cause much pain. Indeed, the position needed to reach it can cause a lot of strain on the arm. This is less of a problem with smaller keyboards as there is less movement needed to reach it, and it can be even better with mouses like the Logitech MX Vertical, or by using trackpads or trackballs. But another possibility, at least for programmers, is to simply avoid using a mouse altogether and stick to the keyboard. This can help keep a good position by reducing unnecessary movement, and also greatly improve speed and productivity.
For example, my current workflow allows me to spend most of my time with my hands in a resting position and have everything I need at the tip of my fingers thanks to remaps. This is my current keyboard:
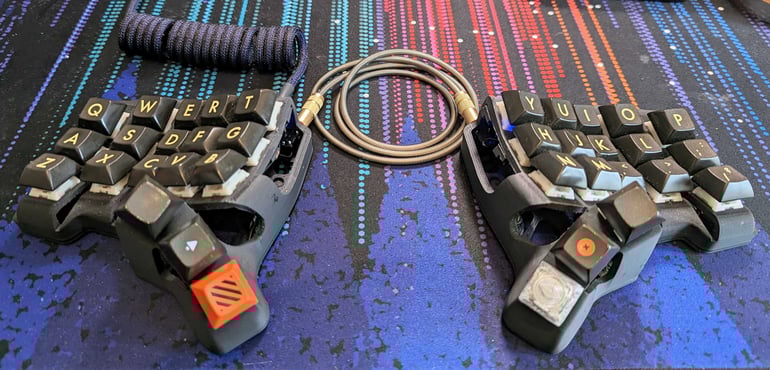
After turning on my computer, I press on the side of my hardware security key, the OnlyKey DUO, to enter the long passphrase necessary to decrypt my SSD, and press on the other side of the OnlyKey to log into my session. I use i3 as a tiling window manager and a simple remap, <Super-Shift-Space>, allows me to start and organise everything I need to be ready to start working. After selecting KeePassXC, another press on the OnlyKey logs me in: I now have all my SSH and GPG keys loaded and ready to be used thanks to ssh-agent. I then select my terminal, type start and then press the <Enter> key. This loads my status bar, sets a wallpaper and reloads the Logitech daemon to control my mouse. Then, thanks to tmux-sessionizer, <CTRL-f>j starts a new tmux session right in the project I am currently working on. v.<Enter>, followed by <Space>el opens Neovim in the current directory and loads my latest saved Neovim session.
I am now ready to make changes and commit them securely (signed) without any more hassle.
All of this took 4 hand extensions to reach the power button of the computer and the hardware security key. Other than that, it took me only 24 key presses to get to that point, without moving my fingers further than 1 key away from the home row, thanks to my physical keyboard layout and home row mods. This could be much improved in terms of efficiency in this particular use-case, but there is a trade-off as I would lose some flexibility in terms of being able to reuse parts of these actions in other use-cases.
This concept of optimising movement and position helps to improve my well-being and focus, which then helps to get in a state of flow as fast as possible, for as long as possible, which in turn greatly improves my productivity.
Of course, even for those of us who would prefer to stay in our terminal permanently, we do need to “get out” sometimes. The good news here is that it is possible to extend this thinking even when using other tools. Most applications have shortcuts allowing you to stay on your keyboard. When browsing the internet, Surfingkeys is a plugin that will allow you to navigate using Vim keybindings (and do much more). Warpd is another interesting tool that allows you to get rid of the mouse to get around your entire screen using different modes. And, when really needed, you could either have a virtual layer of your keyboard acting as a mouse, or even a trackpad or trackball directly integrated into your keyboard!
How to begin
All of it seems very complex, I don't have time for this.
Fair enough. Whilst some of us like to spend our evenings building keyboards and tinkering with keyboard layouts, it is—fortunately—not required to benefit from ErgoMechKeyboards.
We can make a parallel with Cloud Native. There is no need to go all in right away! An iterative approach is very much possible and even advised. There is no right or wrong here, but if you want to try an ErgoMechKeyboard I’d consider a couple of options:
If you're happy with soldering, there are amazing kits on splitkb.com. If not, or if you prefer not to spend too much time on this first, I would advise going for the Keyboardio Atreus. It is great and its value is phenomenal, it is hard to find something ready to use at such low prices.
Of course there are other, more creative, options. Container Solutions' Chief Editor, who is largely keyboard agnostic, eliminated his RSI more-or-less entirely by switching from a mouse to a basic Apple trackpad. Trance DJ BT regularly switches his mouse between the left and right side to allow him to work in the studio for longer periods. Some people also prefer to use a Wacom drawing tablet with a pen, even for non-drawing work.
Regardless of the approach you take, however, may your road to frictionless DevEx be pain free! Also, if you want to learn more about this topic, I'm speaking at WTF is SRE in May.