
If you are a little like me, chances are you get bored of ‘Hello World!’ examples quite quickly. When it comes to Kubernetes, the typical introductory article goes like this:
- Deploy a ‘Hello, World!’ application.
- Expose the application to the outside world in some way.
- Scale the application to a few replicas.
This is fun and all, for the first 4 minutes, then you are left alone with a very extended documentation and the daunting task of deciding what to do next. In this article, I want to document my attempt to go beyond the ‘Hello, World!’ phase of learning Kubernetes while having a bit of fun in the process.
We are going to build a simple REST-like application that will be used throughout the sections of this article. In each section, we are going to expose several Kubernetes concepts and use them to enrich our simple application with additional moving parts. The idea is to provide an overview of how it is possible to structure and deploy an application on top of Kubernetes primitives.
We will start by presenting our very own ‘Hello, World!’ application and deploy it using the “smallest deployable units of computing that can be created and managed in Kubernetes”: the Pod. We will then expose the application to the outside world using Services and Deployments. Finally, we will venture beyond ‘Hello World!’ by exploring how we can make our application more interesting with a simple frontend using the sidecar pattern, making our application more scalable by decoupling frontend and backend and even adding a distributed persistent storage powered by CockroachDB using StatefulSets and PersistentVolumes.
Prerequisites
Minikube is a great and inexpensive way to get your hands on an almost feature complete Kubernetes cluster in a very short amount of time. In this article, I will assume you have a minikube up and running and the kubectl command configured to reference your minikube cluster.
All the sample applications, configurations and manifests referenced in this article have been tested and made available here.
Well, Hello World!
Our ‘Hello, World!’ application is a very unsophisticated key/value store that will expose just one HTTP handler by which it will be able to create, read, update and delete records of arbitrary information. In particular, each record will be simply represented as a JSON object:
{
 "Key": "my key",
 "Value": "my value"
}
And the operations:
- GET /store will return the content of our store.
- PUT /store will create/update the record specified as request body.
- DELETE /store will delete the record specified as request body.
The next few lines of code implement what just described above using the net/http interface in go:
func getStoreHandler(dataStore datastore.Datastore) func(http.ResponseWriter, *http.Request) {
	return func(w http.ResponseWriter, r *http.Request) {
		status := http.StatusOK
		switch r.Method {

		case "GET":
			w.Header().Add("Content-type", "application/json")
			err := json.NewEncoder(w).Encode(dataStore.Get())
			if err != nil {
				status = http.StatusInternalServerError
				w.WriteHeader(status)
			}

		case "PUT":
			record := datastore.Record{}
			err := json.NewDecoder(r.Body).Decode(&record)
			if err != nil {
				status = http.StatusBadRequest
				w.WriteHeader(status)
				fmt.Fprintln(w, err)
			} else {
				dataStore.Add(record)
				status = http.StatusCreated
				w.WriteHeader(status)
				fmt.Fprintln(w, "OK")
			}

		case "DELETE":
			record := datastore.Record{}
			err := json.NewDecoder(r.Body).Decode(&record)
			if err != nil {
				status = http.StatusBadRequest
				w.WriteHeader(status)
				fmt.Fprintln(w, err)
			} else {
				dataStore.Rem(record)
				status = http.StatusOK
				w.WriteHeader(status)
				fmt.Fprintln(w, "OK")
			}

		default:
			status = http.StatusMethodNotAllowed
			w.WriteHeader(status)
		}

		log(fmt.Sprintf("%s - %s %d", r.Method, r.URL.Path, status))
	}
}
Once our application is dockerized, let’s see how we can run it in our minikube cluster. The simplest way to achieve this is to create a Pod that will run a single container with our app in it, as specified in the following manifest:
cat manifests/webapp-pod.yml
(out) apiVersion: v1
(out) kind: Pod
(out) metadata:
(out)   name: webapp
(out) spec:
(out)   containers:
(out)     - name: webapp
(out)       image: containersol/k8sbhw-webapp:latest
(out)       ports:
(out)         - containerPort: 9009
To deploy our app we can use kubectl create:
kubectl create -f manifests/webapp-pod.yml
(out) pod "webapp" created
Let’s verify that our pod is actually running by:
kubectl get pods
(out) NAME      READY     STATUS    RESTARTS   AGE
(out) webapp    1/1       Running   0          3m
Great, so it is finally time to greet the world properly by exposing our application outside of the minikube cluster. The command kubectl port-forward can be used to expose a TCP port on localhost and forward the traffic to a specific Pod running in the cluster:
kubectl port-forward webapp 9009
(out) Forwarding from 127.0.0.1:9009 -> 9009
Then, in another terminal:
curl -s http://localhost:9009/store<
(out) []
Nice! This means that there are no records in our key/value store. Let’s try to put something in it:
kubectl port-forward webapp 9009
(out) Forwarding from 127.0.0.1:9009 -> 9009
Ok! This is what we expected, our ‘Hello, World!’ application works. We are ready to go beyond!
Beyond Hello, World!
So, now we have a simple CRUD application that exposes a (quasi) REST interface. Cool.
Would be even cooler if we could get rid of the cumbersome second terminal running kubectl port-forward and access the application directly. Even more cool, we could deploy a web frontend next to it and interact with it in a less awkward way than raw http requests from command line.
Let’s take care of kubectl port-forward first. To ditch it, we are going to deploy our app using a Service. Here’s how:
cat manifests/webapp-service.yml
(out) apiVersion: v1
(out) kind: List
(out) items:
(out) - apiVersion: apps/v1beta1
(out)   kind: Deployment
(out)   metadata:
(out)     name: webapp
(out)   spec:
(out)     template:
(out)       metadata:
(out)         labels:
(out)           run: webapp
(out)       spec:
(out)         containers:
(out)           - name: webapp
(out)             image: containersol/k8sbhw-webapp:latest
(out)             ports:
(out)               - containerPort: 9009
(out) - apiVersion: v1
(out)   kind: Service
(out)   metadata:
(out)     name: webapp
(out)     labels:
(out)       run: webapp
(out)   spec:
(out)     type: NodePort
(out)     ports:
(out)     - port: 9009
(out)       nodePort: 32009
(out)     selector:
(out)       run: webapp
In this manifest we specify that our web app should be run in a Deployment, which is a declarative way of expressing the desired state of your application. In our case, we declare that our web app runs in a single container on port 9009 and we attach the label ’run: webapp’ to the Deployment.
The Service will abstract the containers running in the Deployment and expose them through a port outside of the cluster. The ‘run: webapp’ label in the selector section ties this Service to the Deployment declared above. When deploying the Service, the kubernetes master will allocate a random port from a specific port range (30000-32767 by default) and each Node of the cluster will proxy that port to the correct Pod. In our manifest, we explicitly declare this port to be 32009. Let’s deploy the manifest:
kubectl create -f manifests/webapp-service.yml
(out) deployment "webapp" created
(out) service "webapp" created
Since we are using minikube, we can use its CLI to know how to reach our Service:
minikube service list
(out) |-------------|----------------------|-----------------------------|
(out) |  NAMESPACE  |         NAME         |             URL             |
(out) |-------------|----------------------|-----------------------------|
(out) | default     | kubernetes           | No node port                |
(out) | default     | webapp               | http://192.168.99.100:32009 |
(out) | kube-system | default-http-backend | http://192.168.99.100:30001 |
(out) | kube-system | kube-dns             | No node port                |
(out) |-------------|----------------------|-----------------------------|
The IP address in the table above is in fact the address of the only minikube Node.
Let’s make sure the web app is responding:
curl http://192.168.99.100:32009/store
(out) []
Great, our app is exposed and we don’t need kubectl proxy anymore. Time to focus on the frontend!
Two peas in a pod
Our frontend is a rather simple one. We will use an nginx container to serve some static content: an index page and the JavaScript code on ‘/’. Additionally, we want to be able to reach the webapp through the ‘/webapp’ location.
In this manifest we are going to run the webapp and the frontend containers in the same pod and expose the frontend as a Service:
cat manifests/webapp-frontend-single-pod.yml
(out) apiVersion: v1
(out) kind: List
(out) items:
(out) - apiVersion: apps/v1beta1
(out)   kind: Deployment
(out)   metadata:
(out)     name: webapp
(out)   spec:
(out)     template:
(out)       metadata:
(out)         labels:
(out)           run: webapp
(out)       spec:
(out)         containers:
(out)           - name: webapp
(out)             image: containersol/k8sbhw-webapp:latest
(out)             ports:
(out)               - containerPort: 9009
(out)           - name: frontend
(out)             image: containersol/k8sbhw-frontend:latest
(out)             ports:
(out)               - containerPort: 80
(out) - apiVersion: v1
(out)   kind: Service
(out)   metadata:
(out)     name: frontend
(out)     labels:
(out)       run: frontend
(out)   spec:
(out)     type: NodePort
(out)     ports:
(out)       - port: 80
(out)         nodePort: 32080
(out)     selector:
(out)       run: webapp
This is a simple NGINX configuration used in the frontend container that enables the behavior we just described above:
cat frontend/default.conf
(out) server {
(out)     listen       80;
(out)     server_name  _;
(out)     location / {
(out)         root   /usr/share/nginx/html;
(out)     }
(out)     location /webapp/ {
(out)         proxy_pass         http://localhost:9009/;
(out)         [...]
(out)     }
(out) }
Since containers running in the same Pod are effectively sharing the same network, all the traffic destined to /webapp/ can be proxied to the webapp using http://localhost:9009/. This is very convenient when an application has a sidecar container that could benefit from running as close as possible as the main application.
Let’s see this in action. As we did before, let’s create the Deployment and the Service by deploying the manifest:
kubectl create -f manifests/webapp-frontend-single-pod.yml
(out) deployment "webapp" created
(out) service "frontend" created
Since we have a proper frontend, this time we can launch the Service directly in our browser using minikube CLI:
minikube service frontend
(out) Opening kubernetes service default/frontend in default browser...
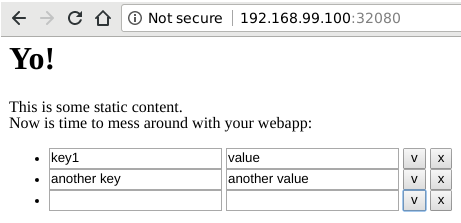
So we can finally play around with our web app in our browser!
Scaling up and down
A key moment in Kubernetes ‘Hello, World!’ articles is demonstrating the ability to scale up and down instances of running application components. However, our app is not quite ready to do that just yet.
In fact, scaling the application deployed using the previous manifest would lead to some odd behavior: our web app is extremely simple, so the key/value store is held in memory in each container. Scaling happens at the Pod level, this means that each Pod will have its own separate key/value store. HTTP Requests will be load balanced across instances and land on different web app instances. Therefore, each client will interact with a random key/value store and the end result will be quite unpredictable.
To prevent this, we need to create two separate Services, one for the web app and one for the frontend and scale the frontend independently from the web app. Here is the updated manifest:
cat manifests/webapp-frontend-services.yml
(out) apiVersion: v1
(out) kind: List
(out) items:
(out) - apiVersion: apps/v1beta1
(out)   kind: Deployment
(out)   metadata:
(out)     name: webapp
(out)   spec:
(out)     template:
(out)       metadata:
(out)         labels:
(out)           run: webapp
(out)       spec:
(out)         containers:
(out)           - name: webapp
(out)             image: containersol/k8sbhw-webapp:latest
(out)             ports:
(out)               - containerPort: 9009
(out) - apiVersion: apps/v1beta1
(out)   kind: Deployment
(out)   metadata:
(out)     name: frontend
(out)   spec:
(out)     template:
(out)       metadata:
(out)         labels:
(out)           run: frontend
(out)       spec:
(out)         containers:
(out)           - name: frontend
(out)             image: containersol/k8sbhw-frontend:latest
(out)             ports:
(out)               - containerPort: 80
(out) - apiVersion: v1
(out)   kind: Service
(out)   metadata:
(out)     name: webapp
(out)     labels:
(out)       run: webapp
(out)   spec:
(out)     ports:
(out)     - port: 9009
(out)       targetPort: 9009
(out)     selector:
(out)       run: webapp
(out) - apiVersion: v1
(out)   kind: Service
(out)   metadata:
(out)     name: frontend
(out)     labels:
(out)       run: frontend
(out)   spec:
(out)     type: NodePort
(out)     ports:
(out)       - port: 80
(out)         nodePort: 32080
(out)     selector:
(out)       run: frontend
Before deploying, we also need to adjust the proxy pass configuration of the nginx server: the web app and frontend containers could be potentially running on a different Pod (or even Node, if we had more than one). This is easily done, since Kubernetes DNS allows to access Services using their name, we can use http://webapp:9009/ to reference the web app:
cat frontend/default.conf
(out) server {
(out)     listen       80;
(out)     server_name  _;
(out)     location / {
(out)         root   /usr/share/nginx/html;
(out)     }
(out)     location /webapp/ {
(out)         proxy_pass         http://webapp:9009/;
(out)         [...]
(out)     }
(out) }
Once deployed, we can scale the frontend service independently from the webapp one and have correct interactions with the key/value store:
kubectl scale deployment/frontend --replicas 3
(out) deployment "frontend" scaled
Let’s check the running pods:
kubectl get pods
(out) NAME                        READY     STATUS    RESTARTS   AGE
(out) frontend-65fc975b58-2b9xx   1/1       Running   0          14m
(out) frontend-65fc975b58-9n776   1/1       Running   0          12m
(out) frontend-65fc975b58-cvnkv   1/1       Running   0          12m
(out) webapp-595f6cb79c-wpqw4     1/1       Running   0          14m
We can verify that each frontend Pod receives traffic inspecting the logs in separate terminals:
kubectl logs --follow frontend-65fc975b58-2b9xx
(out) 172.17.0.1 - - [01/Dec/2017:11:16:48 +0000] "GET /webapp/store HTTP/1.1" 200 3 "-" "curl/7.56.1" "-"
This is quite neat! But what if we want to scale the web app Service? Then, we would run into the same multiple key/value store problem described above. Let’s see how we can solve this with some help.
Persistence pays off
‘Hello, World!’ applications are typically stateless, meaning that the content of the application doesn’t change overtime. If we want to go beyond ‘Hello, World!’, it’s time to get our hands dirty and make our application truly stateful.
We are going to externalize the key/value store that has so far been held in memory in our web app application instances using the distributed SQL database CockroachDB.
CockroachDB is fit for our purpose since it offers support for Kubernetes out of the box. However, describing a proper multi-node deployment of CockroachDB is not in the scope of this article. The steps reported here are loosely based on this guide where more details can be found. To deploy a simple three Pod database we can directly use the provided manifest:
kubectl create -f https://raw.githubusercontent.com/cockroachdb/cockroach/master/cloud/kubernetes/cockroachdb-statefulset.yaml
Since our goal is to learn more about Kubernetes, it is however useful to explore this manifest. We can see that it declares a Service used to expose the SQL (grpc) interface on port 26247. This is what our application will need to use to connect to the database. Additionally, it exposes an HTTP port to reach the CockroachDB web interface that can be used to keep an eye on the state of the database cluster and that we will use later on in this article:
apiVersion: v1
kind: Service
metadata:
  # This service is meant to be used by clients of the database.
  name: cockroachdb-public
  labels:
    app: cockroachdb
spec:
  ports:
  - port: 26257
    targetPort: 26257
    name: grpc
  - port: 8080
    targetPort: 8080
    name: http
  selector:
    app: cockroachdb
So far, we organized the components of our application in Deployments. Since everything is stateless, each Pod in our application is essentially interchangeable. This is no longer the case with CockroachDB: data is replicated across the nodes in the cluster, therefore each node must be uniquely identified (i.e. have the same hostname) even across container restarts. For this reason, in the provided manifest, CockroachDB replicas (or nodes) are handled by a StatefulSet which is able to maintain a specific identity for each Pod:
apiVersion: apps/v1beta1
kind: StatefulSet
metadata:
  name: cockroachdb
spec:
  serviceName: "cockroachdb"
  replicas: 3
  template:
    metadata:
      labels:
        app: cockroachdb
    spec:
      containers:
      - name: cockroachdb
        image: cockroachdb/cockroach:v1.1.3
        ports:
        - containerPort: 26257
          name: grpc
        - containerPort: 8080
          name: http
        volumeMounts:
        - name: datadir
          mountPath: /cockroach/cockroach-data
        command:
          - "/bin/bash"
          - "-ecx"
          - "exec /cockroach/cockroach start --logtostderr --insecure --host $(hostname -f) --http-host 0.0.0.0 --join cockroachdb-0.cockroachdb,cockroachdb-1.cockroachdb,cockroachdb-2.cockroachdb"
      volumes:
      - name: datadir
        persistentVolumeClaim:
          claimName: datadir
  volumeClaimTemplates:
  - metadata:
      name: datadir
      annotations:
        volume.alpha.kubernetes.io/storage-class: anything
    spec:
      accessModes:
        - "ReadWriteOnce"
      resources:
        requests:
          storage: 1G
Storage in the StatefulSet is handled using a Persistent Volume. Persistent Volumes are Kubernetes cluster storage resources that can be mounted by Pods. Their life-cycle is independent from Pods state, so data will persist even after containers have been terminated.
Once the CockroachDB StatefulSet is up and running, we need to initialize the cluster and create the database for our webapp to use. To do this we are going to use Jobs. Jobs can be used to reliably execute commands inside Pods in the Kubernetes cluster. Let’s take a look at the job used to initialize the database:
cat manifests/database-init.yml
(out) apiVersion: batch/v1
(out) kind: Job
(out) metadata:
(out)   name: database-init
(out)   labels:
(out)     app: cockroachdb
(out) spec:
(out)   template:
(out)     spec:
(out)       containers:
(out)       - name: cluster-init
(out)         image: cockroachdb/cockroach
(out)         imagePullPolicy: IfNotPresent
(out)         command:
(out)           - "/cockroach/cockroach"
(out)           - "sql"
(out)           - "--insecure"
(out)           - "--host=cockroachdb-public"
(out)           - "-e CREATE DATABASE gorm"
(out)       restartPolicy: OnFailure
All this Job does is spin up a Pod with a single container that runs the cockroach executable which connects to the cockroach-public SQL interface described above and execute a CREATE DATABASE SQL statement.
Before launching this Job we need to initialize the cluster by joining all nodes together, to do this we are going to use the cluster-init job provided in the CockroachDB guide.
kubectl create -f https://raw.githubusercontent.com/cockroachdb/cockroach/master/cloud/kubernetes/cluster-init.yaml
kubectl create -f database-init.yml
We can check that the jobs completed successfully:
kubectl get jobs
(out) NAME            DESIRED   SUCCESSFUL   AGE
(out) cluster-init    1         1            5m
(out) database-init   1         1            5m
We are finally ready to use the SQL database from the web app. To do this we are going to update the webapp Deployment by injecting the SQL_DATASTORE_CONNECTION environment variable in the containers running the web app application. The value of the variable will be the connection string that the web app will use to access the database:
cat manifests/webapp-frontend-backend.yml
(out) apiVersion: v1
(out) kind: List
(out) items:
(out) - apiVersion: apps/v1beta1
(out)   kind: Deployment
(out)   metadata:
(out)     name: webapp
(out)   spec:
(out)     template:
(out)       metadata:
(out)         labels:
(out)           run: webapp
(out)       spec:
(out)         containers:
(out)           - name: webapp
(out)             image: containersol/k8sbhw-webapp:latest
(out)             env:
(out)             - name: SQL_DATASTORE_CONNECTION
(out)               value: host=cockroachdb-public port=26257 user=root dbname=gorm sslmode=disable
(out)             ports:
(out)               - containerPort: 9009
(out)
(out) [...]
Since the Deployment is in charge of keeping the desired state, here’s a quick and dirty way to refresh the Pods in the web app Deployment:
kubectl apply -f manifests/webapp-frontend-backend.yml
kubectl delete pod webapp-6594847b8f-24jll
(out) pod "webapp-6594847b8f-24jll" deleted
Now that the key/value data is stored outside of the web app Pods, we can scale this Deployment:
kubectl scale deployment/webapp --replicas=3
It’s finally time to have some fun: let’s play around with the web app to generate some traffic. Let’s add 500 records to our key/value store:
shuf -n 500 /usr/share/dict/words | while read i ; do (curl -X PUT -d "{\"Key\":\"$i\", \"Value\": \"$i-Value\"}" http://192.168.99.100:32080/webapp/store &); sleep 0.01 ; done
(out) OK
(out) OK
(out) OK
(out) [...]
And now remove all of them:
curl -s http://192.168.99.100:32080/webapp/store | jq -r '.[].Key' | while read i ; do (curl -X DELETE -d "{\"Key\":\"$i\"}" http://192.168.99.100:32080/webapp/store &); sleep 0.01 ; done
(out) OK
(out) OK
(out) OK
(out) [...]
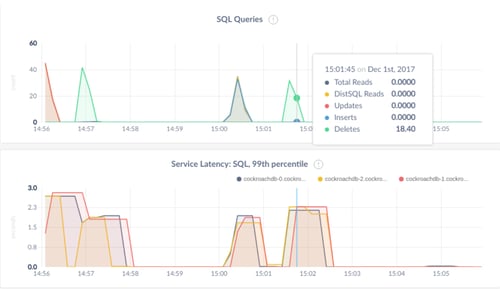
We can now use the CockroachDB web interface to verify that the database is being used:
kubectl port-forward cockroachdb-0 8080
Conclusions
The application presented in this article is still far from being production ready, let alone useful. However, our goal was to explore several Kubernetes concepts while having fun. In this scope, we have seen how to organize a typical ‘Hello, World!’ application using Pods. We then made the application slightly more complicated by adding a frontend and using Deployment and Services. We have seen how to scale Deployments and reference Services internal to the cluster. Finally, we deployed CockroachDB, a stateful service, using a StatefulSet, PersistentVolumes and we initialized our database using Jobs. All layers of this app can now be scaled independently from one another and all components will be restarted by Kubernetes in case of failures. I would say it is pretty neat, well, at least more fun than a ‘Hello, World!’ application!
We have a course about Production Grade Kubernetes. Click on the image to find out more or email us at info@container-solutions.com.