
The Extended Berkeley Packet Filter—eBPF to its friends— is changing everything. Before eBPF came along, kernel tracing, heavy network control, or some forms of observability were clunky or impossible to be performed in production because of performance overhead, or even simply because of lack of convenience. With eBPF, we now have a programmable Linux Kernel that only runs safe code, and delivers endless possibilities for tools to be created.
This is the second part of a series on eBFP; you can find the previous part here. In this blog post, I will show you some tools that use eBPF technology under the hood. For each tool, I will give an overview of its functionalities, briefly show what you can do with it, and focus on the parts that make use of eBPF to work.
Here are some tools that are emerging in this space and gaining increasing popularity.
Falco
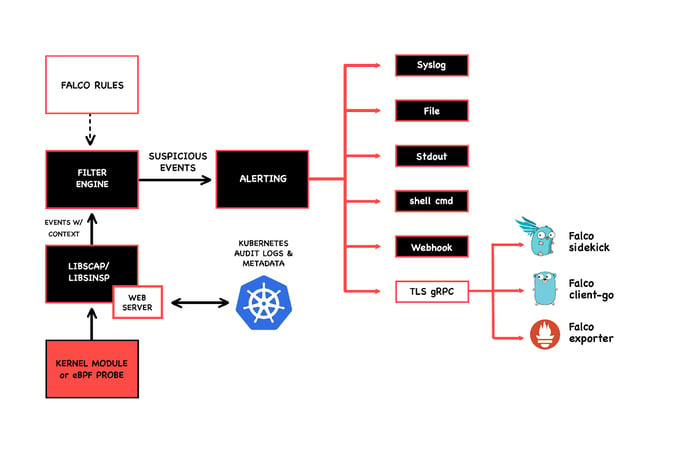
Falco is a Cloud Native runtime security tool. It monitors anomalous activity in nodes and containers. It can trigger functions to act on this unexpected behaviour or simply report it to appropriate channels.
The basic workflow to start working with Falco can be as follows:
- Define a rule for Falco to monitor (anomalous behaviour).
- Configure Falco to publish the alert to a topic, queue, chat, or log aggregator.
- (optional) Configure something to be triggered by the alert, like an AWS Lambda or a Google Cloud Function.
There are a few options for Falco drivers from which you can get system call events. But if you have a recent kernel that supports eBPF and you tell Falco to use its eBPF probe driver, all its monitoring features will be eBPF based per se.
Here's how Falco uses eBPF:
The following are some examples of features that I find interesting and are simple to set up.
Detecting a Shell Running on a Container or Node
Someone getting access to a container and running commands manually is something that happens in development/integration/staging environments fairly often, and probably should not trigger an alert. But this happening in your production environment could be a sign of a breach, especially if you cannot track to an incident period. Falco can generate an alert the moment someone gets shell access to a container or a machine on your infrastructure.

Unexpected Process Spawn on a Container or Node
Let us say that you have a container that should only run your front-end application. Only the process of whatever is serving your front end (npm) should be running in this container. Depending on what operating system you are using, or if you don't have AppArmor or SELinux enabled, malicious software can still be installed and run at runtime within a live container.
Falco can detect this unexpected process spawn in a rule very similar to the previous one. Instead of looking for a specific shell process, you can leave the rule looking for any rogue process in your containers (or machines).
Outbound Connection to Untrusted Domain
Needless to say, if your workloads are accessing domains that you don't recognise, you should probably look it up. It could be a threat inside your infrastructure, but it could also be that one of your upstream dependencies is compromised. Falco already has a macro to detect this kind of outbound network traffic, and you can set up a rule to use it.
Malicious Kubernetes API Calls
Falco can also monitor the calls that developers and operators send to the Kubernetes API. You can set rules that will tell it to monitor if someone is performing obviously risky tasks, such as granting cluster-admin permissions to new users or creating ConfigMaps with sensible information.
Try It Out
The most interesting way to quickly and thoroughly test its capabilities for me was by following this guide from Sysdig. Through it, you can see it working with the full alert and action loop.
Besides being able to see Falco's default rules in action, it will set up Cloud Functions that can, for example, delete a pod if someone grabs a shell of a container. Falco's documentation has some examples that can shine a light on its capabilities, and also some Kubernetes API audits rules to configure.
Visualisation
Falco does not have its own front end, but you can build your own integrations to visualise the data that it generates. One option is to pay for Sysdig's enterprise solutions, which include a web front end for Falco.
Inspektor Gadget
Inspektor Gadget is a cool tool developed by Kinvolk to help with debugging, tracing, and observing applications inside of Kubernetes.
The basic workflow to start working with Inspektor Gadget can be as follows:
- Deploy its agents in your cluster as privileged DaemonSets.
- Install the gadget kubectl plugin to start consuming its internal tools.
- Choose a gadget and use it to probe specific data.
Its agents are deployed to your cluster as a privileged DaemonSet and they use in-kernel BPF programs to monitor syscalls related to pods. Some of its internal tools are based on BCC's eBPF tools collection. All of its features are eBPF based. I will go over a few that I find particularly interesting.
Tracelooping
Inspektor Gadget's traceloop tool uses the standalone eBPF traceloop tool underneath. From the moment that you deploy the privileged DaemonSet forward, all your pods system calls will be traced and a few of the recent calls will be stored so you can consume them later. This is especially interesting when a pod fails and you can still access its postmortem tracing data to find out why.
Execsnoop and Opensnoop
I think that if you need a tool to continuously monitor spawned processes or opened files, Falco would be the best choice, as it also gives you alerts and a way to deal with the event. Still, these are very cool tools to easily and quickly probe a pod during a debugging session or to figure out what is happening right now instead of continuously monitoring (processes or files).
Bootstrapping Initial Network Policies
This tool is pretty handy to design network policies for your Kubernetes workloads without having to start fresh. The idea is that if you’ve already deployed your applications to Kubernetes and they are already talking to each other, you can use this tool to monitor their communications to ‘suggest’ network policies for you to apply. Ideally, you would go over them and tweak them to your needs, but they still provide a solid starting point.
Try It Out
Alban Crequy and Marga Manterola gave a cool workshop during the 2020 Kubecon, and they documented the instructions in this GitHub repository. They also talk about kube-trace and some other topics in this workshop. The Network Policy Advisor tool can be pretty handy if you are planning to test some of the tools in this article, so you don't have to write them from scratch.
Visualisation
Inspektor Gadget is meant to be used with their kubectl plugin, so right now it is mainly a CLI tool. You can still build your own integrations to visualise its data.
Hubble
Hubble is a network and security observability tool. Even though it is somewhat part of Cilium, I want to go over its functionality first, since Cilium itself will be more complex.
The basic workflow to start working with Hubble can be as follows:
- You are already using Cilium.
- Since Cilium and Hubble's agent are the same thing now, you only need to deploy Hubble's relay and UI.
- Then you use it to visualise its service map, flows, and policies being applied.
Another possible workflow:
- You are using another CNI plugin (not Cilium).
- Deploy Cilium on top of another CNI.
- Hubble can still rely on Cilium for gathering Flow data.
While Cilium sends BPF programs to the kernel to control the flow of packets, enforcing policies and load balancing, Hubble extracts events generated from this flow to generate a log of flow data and metrics to be consumed. All of its features are eBPF related, since all of its data come from the events map in the eBPF datapath. Let's have a look at Hubble capabilities.
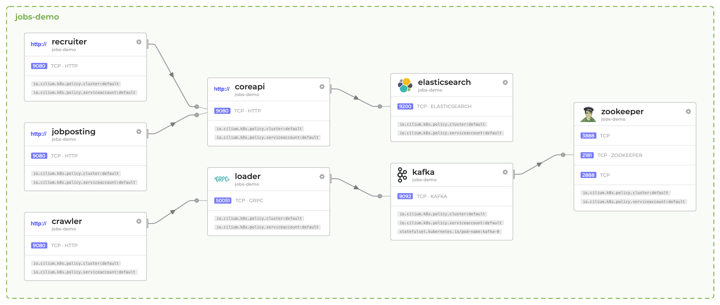
Service Dependences and Communication Map
This feature offers the visualisation of a map of service connections. With the increasing number of microservices in your architecture, it can become quite hard to understand who talks to whom, and what the flow of data in your setup is. It is possible to get this type of visualisation with service meshes, but with Hubble the overhead is way lower (with a service mesh, you would probably need a sidecar per pod and way more traffic load). (For a better look at the following image, here's a PDF.)
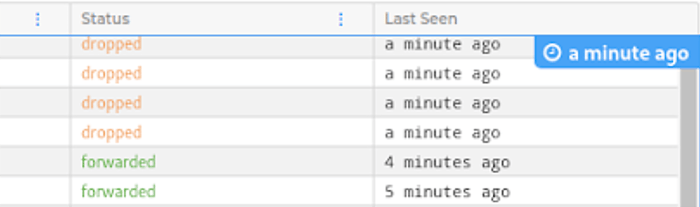
Data Flow Logs and Filtering
Every time a packet travels through your services it will generate a log in this list. Hubble call this information data flow, or just Flow. Each Flow provides information about the source pod and service, destination pod and service, destination ip and port, status of the packet telling us if it was dropped or forwarded, and a ´last seen´ timestamp. We can also filter for key values like `ip=0.0.0.0` or `dns=google.com`.
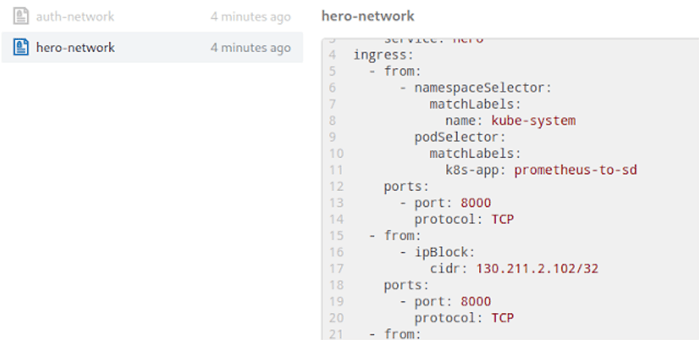
Policies Visualisation
This is just a simple tab to see what network policies are in place together with their definition. (For a better look at the following image, here's a PDF.)
Try It Out
If you already spun up a GKE cluster to test the tools I previously mentioned, I would highly recommend you follow this official tutorial to deploy Cilium and Hubble on top of GKE. To enable Hubble UI, just follow the instructions to enable Hubble for Cluster-Wide visibility. Deploy any multi-service setup to visualise the service map, and use the Inspektor Gadget network policy bootstrapper to visualise these policies being enforced on your Flows (remember to change them to kind: CiliumNetworkPolicy and adapt them accordingly).
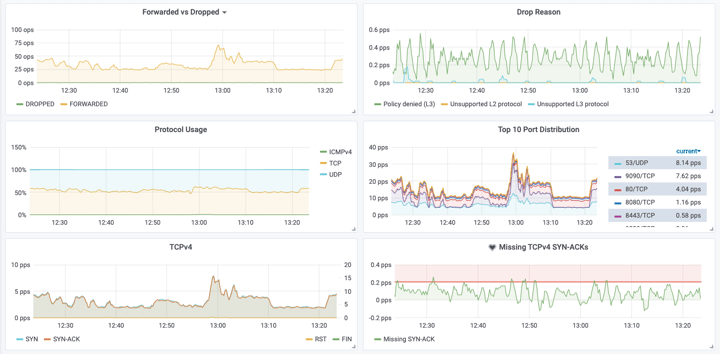
Visualisation
Hubble has a nice-looking UI that you can check on the examples above, but you can also export its metrics to visualise more data in a Prometheus + Grafana setup. (Graphs below taken from Hubble's GitHub page)
Cilium
I know that to use Hubble you actually need to deploy Cilium first, and if you tried the previous tutorial that I mentioned, you did just that. However, I wanted to talk about Hubble first, since Cilium brings somewhat complex (and a bit hard to test) features to the table.
OK, so what is Cilium anyways? Cilium is a Kubernetes cni plugin that is based entirely on eBPF for providing and transparently securing network connectivity and load balancing between application workloads.
Since Cilium truly shines when you have really huge clusters or a really big multi-cluster setup, it makes a lot of sense to choose it if you are in this situation and/or you need a high throughput solution. So the first step is checking that.
After that, you can follow next steps:
- Adapt your cluster provisioning strategy to use Cilium as the pod network solution.
- Cilium gives you a lot of options to start using it, with many different configurations, like replacing kube-proxy with its own Kubernetes proxying solution (avoiding iptables), and what you take from it next is really up to you.
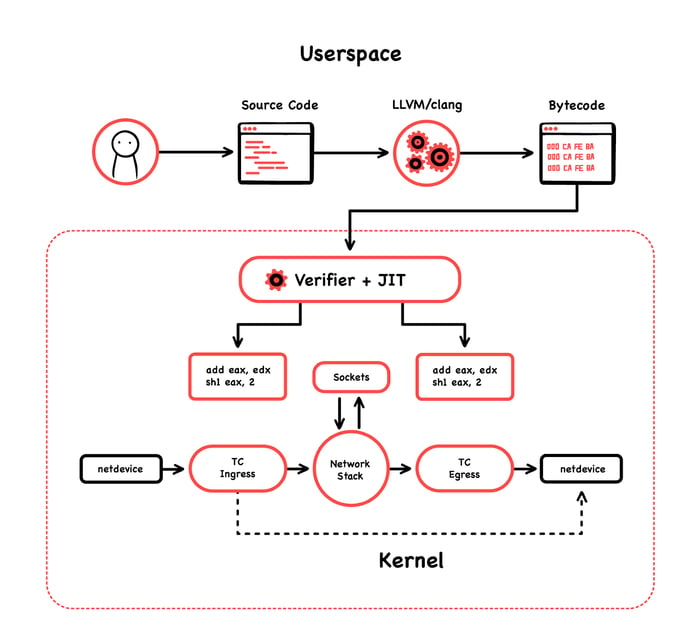
To deliver security and load balancing between services, Cilium leverages eBPF by doing mainly two things. First, it runs eBPF programs at the socket layer. Second, it runs eBPF programs at the XDP/tc layer. (Don't worry too much about these definitions if you are not familiar with them. But if you are still curious about it, you can follow the preceding hyperlinks, and maybe check this other post about implementing eBPF programs in this realm: Load XDP programs using the ip (iproute2) command.
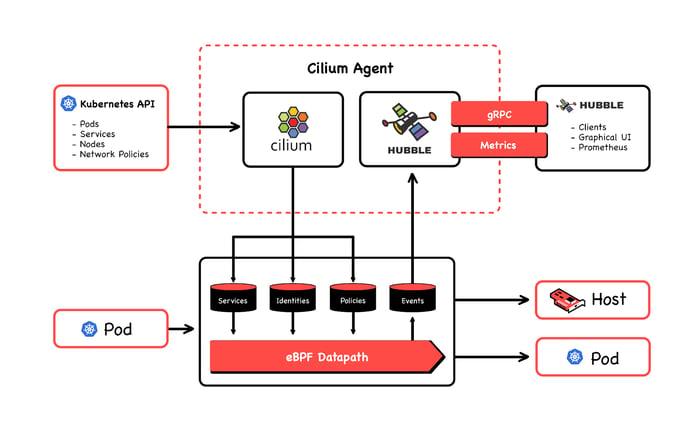
At the socket layer, Cilium handles East-West traffic; that is, all service-to-service communication. At the XDP/tc layer, it handles North-South communication, meaning external traffic coming into the node. Because of that, basically all its features are eBPF based. Let me tell you now about some of these features that I find interesting. (Below, see how eBPF works with Cilum; image courtesy of Cilium's GitHub page.)
No Packet-Level NAT Needed
Since Cilium is using eBPF to know when an application connects or sends packets, it actually catches this at syscall level, before the packet is even created. Doing a packet-level network address translation is somewhat expensive, but the eBPF program that Cilium sends to the socket layer makes the application ‘think’ that it is talking to the service ip:port, when in reality Cilium makes it talk to the back end directly with no NAT.
No Intermediate Node Hops
Using kube-proxy (which uses iptables/netfilter underneath), intermediate node hops would be inevitable, especially in clusters with a lot of nodes. With the same reasoning as the last feature mentioned, Cilium without kube-proxy will send packets directly to its destination without hops or translations.
Hubble Itself
In a way, you can see Hubble as a Cilium feature. To use Hubble, you will go through the Cilium deployment to your cluster anyway.
Clustermesh
ClusterMesh is Cilium's approach to multi-cluster setup. Common use cases are high availability (in case of workload failure, not the cluster itself) and shared services.
Try It Out
If you already deployed Cilium on GKE because of the Hubble section of this blog, you can begin testing some of its features. However, to properly take advantage of all of its capabilities, you will need to create a cluster that uses Cilium as its main CNI plugin (not on top of another CNI plugin). Like most of the tools that use eBPF underneath, you will also need a very recent Linux Kernel running on your nodes.
To use Cilium without kube-proxy, follow this Kubernetes without kube-proxy guide. Before setting up ClusterMesh, make sure you deploy Cilium using dedicated etcd to keep its state Installation with managed etcd. Finally, set up your ClusterMesh. Easier said than done, however, if you encounter any problems, please ping me, or write in the comments, or Cilium's Slack, for help.
Wrapping Up
I was planning on including some other important tools in the cloud landscape that are using eBPF to power their functionalities, but this post started to get huge and I did not want to talk about tools that I hadn’t tested in advance.
Some other tools to keep an eye out can be found in my previous blog post about eBPF, ‘The Top Reasons Why You Should Give eBPF a Chance’; check the ‘Big Players Are Adopting eBPF’ section. Some of these tools are open source, some are enterprise solutions (in those cases, you could try to ask for a trial subscription). Some other tools worth mentioning are Calico, which recently added the option to use its eBPF dataplane, and Katran, a load balancer from Facebook.
I will be writing more about eBPF, now getting deeper into how to write and understand BPF programs. If this is interesting to you, please keep an eye on the next blog posts and on the eBPF space in general. If you read all the way here, let us know of your experience with eBPF or with tools based on it. Would love to hear or read about it!
This blog post originally appeared on The New Stack. You can read the first part of this series on eBPF here.